| Author |
Message |
    
eratosthenes
Citizen
Username: Eratosthenes
Post Number: 17
Registered: 9-2003
| | Posted on Monday, January 19, 2004 - 11:53 am: |     |
I am trying to understand why the water gauge on my steam boiler is always full (above the top of the glass). I watched the boiler go through a cycle this morning. It had been off for about an hour, and I had lowered the water level to operating level. I watched as the level bounced up and down a little, went away, came back in time to watch the level drop from halfway to empty in 5 minutes. Then the LWCO and water feeder kicked in. The otherwise clear water turned brown, apparently from seepage on the top of the gauge. At this point there was water behind the boiler, but I don't think this was from the boiler. I've noticed damp spots under a valve connecting the water intake to the boiler ("backflow"?), this morning it was a damp spot about 2' in diameter and trickling down one side of the boiler perimeter. After the boiler was finished, the gauge was again full past its top.
We have a shutoff valve leaking steam (scheduled to be replaced). I can't see how we could be losing enough water from this to cause the automatic water feeder to fire. Is the feeder overfilling the water gauge because it is filling the boiler while in operation? I thought the water feeder was only supposed to raise water to the minimum level, not half way up the gauge. The likeliest explanation I can come up with is that the gauge is not showing the correct water depth. If that were true, would it be symptomatic of any deeper worries? I tried cleaning the boiler this weekend, but when the relief valve wouldn't yield to mild pressure, I put my hands in my pockets. Can't skim, AFAIK Knucklehead never put in skim tees.
We had water in the radiators last weekend (yup, Knucklehead put the takeoff between the risers). I've lowered the steam pressure to 0.5-1.5 (Kuncklehead had set it to 5) but I expect I will have to put off some house repairs to get the piping redone. |
Master Plvmber
Citizen
Username: Master_plvmber
Post Number: 168
Registered: 3-2003

| | Posted on Monday, January 19, 2004 - 12:10 pm: | |
Your boiler is priming and surging. Adding to this, your piping sounds poorly done.
When you said, "but when the relief valve wouldn't yield to mild pressure", did you mean you were trying to skim throught the relief valve?
Don't do that. Look for a proper skim tapping. Every steam boiler has one.
Master_Plvmber
|
eratosthenes
Citizen
Username: Eratosthenes
Post Number: 18
Registered: 9-2003
| | Posted on Monday, January 19, 2004 - 1:28 pm: | |
Cautioning that I am by no means a steamhead: Looking at the boiler installation manual, where it suggests to put a skimming tee, I see only an elbow in the piping. There may be cleanout tees in the return, but as far as I can judge only a drain valve and elbows in the equalizer.
I was trying to get the relief valve off for a round of dry steam cleaner followed by a round of Colloid. I know the application of these has been discussed in the past. Should I wait until Spring and I can open the windows? If I can get that relief valve off.... Or would I be just as well off blowing down the boiler? The manual recommends doing this once a month (!).
Re pipes: Yes, I expect I will be shopping for estimates for repiping. I'd like to send the bill to Knucklehead. |
tjohn
Citizen
Username: Tjohn
Post Number: 2092
Registered: 12-2001

| | Posted on Monday, January 19, 2004 - 3:39 pm: | |
Eratosthenes,
If you have a digital camera, take and post some pictures.
Meanwhile, I thinking you need to resolve the dirty boiler problem ASAP. When a boiler is dirty, the water will boil and foam up. Sometimes, all of the water will be driven from the boiler into the mains and the low-water cutoff will shut-off the boiler. This puts stress on the boiler and can lead to premature boiler failure. |
eratosthenes
Citizen
Username: Eratosthenes
Post Number: 19
Registered: 9-2003
| | Posted on Monday, January 19, 2004 - 5:32 pm: | |
MP, Tjohn, thanks much for the quick diagnosis.
I'm sure I've screwed up the description of the boiler, but perhaps others will learn from my mistakes. So, on with the pics. This is my first time posting pics, here goes...
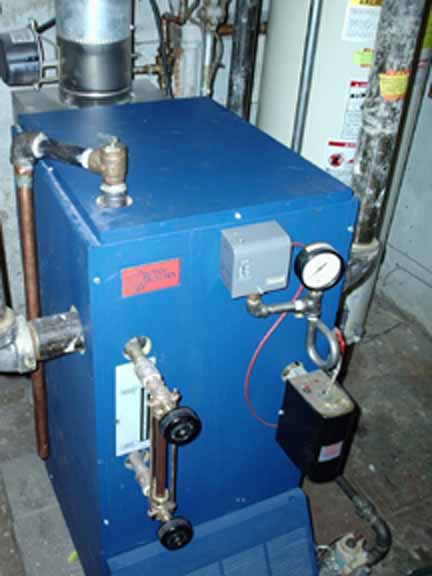
Here is a pic of the boiler from the left while cycling. Notice the very brown water in the gauge. I meant to get in the elbow on the left riser, there is no skimming tee there.
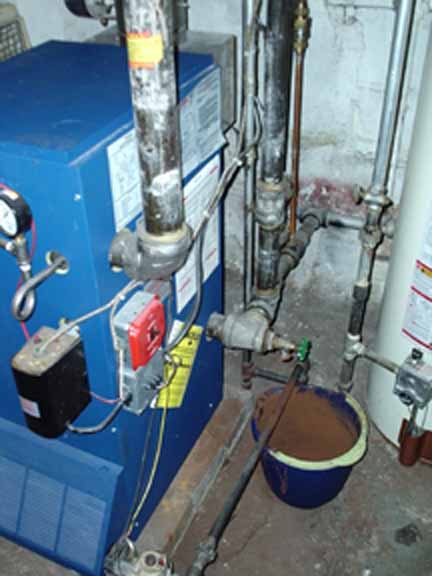
Here is a pic of the boiler, front right. The inside of the bucket tells you how dirty the water is sometimes when draining (not always). According to the manual, you would locate a skimming tee off that riser in the foreground. None here or on the other riser. The manual also suggests cleaning tees down around where the drain-off valve is. And yes, that pipe connecting to the LWCO is getting rusty from sitting just underneath the drain-off valuve....
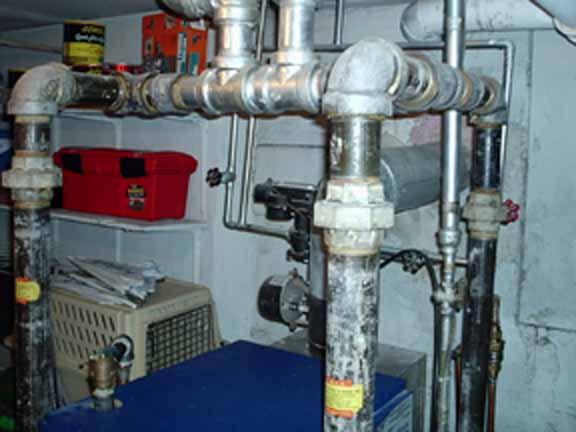
Here is the piping of the risers and takeoffs. I am assuming that the fact that there are two takeoffs does not make a difference, please tell me if I am wrong.
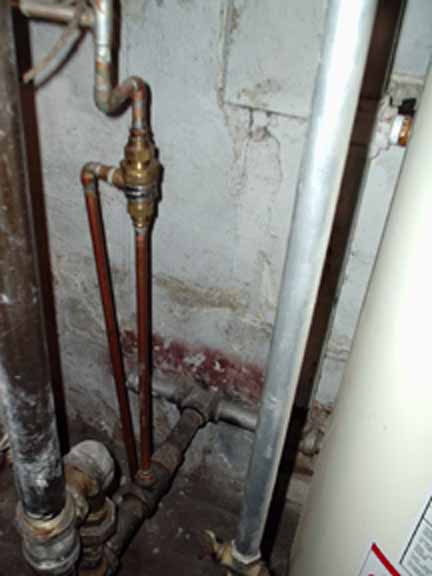
Lastly and probably least importantly, here is the "backflow" valve I cannot identify, at the back of the boiler, under which water appears during these "incidents." Behind and below that are what I interpret as cleanout tees on the returns.
|
Master Plvmber
Citizen
Username: Master_plvmber
Post Number: 169
Registered: 3-2003
| | Posted on Monday, January 19, 2004 - 5:54 pm: | |
The backflow preventer needs to be on the other side of the feed valve. Higher pressure on the outlet side is causing it to discharge. On the bright side, it's working.
The header piping probably works OK but may be contributing to the surging. We all know by now that it isn't done right. Frankly, I'm surprised its not copper.
There may be a quick fix here, though. I think you could actually take one pipe away from the assembly and make it work better. I'd need to know the model of that Utica(?) boiler.
Also, your Hartford Loop should be deeper to hold a taller column of water.
Master_Plvmber
|
tjohn
Citizen
Username: Tjohn
Post Number: 2094
Registered: 12-2001
| | Posted on Monday, January 19, 2004 - 6:44 pm: | |
MP,
That header arrangement looks guaranteed to blow water into the mains. The steam (and any water) coming up on the left side will be blocked from the equalizer by steam coming up on the right side.
Also, although it is very hard to judge from a picture, the wet return looks like 1" iron. That would be unusually small. |
Richard O'Connor
Citizen
Username: Roconn
Post Number: 125
Registered: 6-2001

| | Posted on Wednesday, January 21, 2004 - 8:36 am: | |
MP...no guessing but it looks like a Utica PEG150-C (only think this as it looks exactly like the boiler in my basement (which is the same model).
And UGH...there are no skimming T's ... eek
Erat... There is at least a "happy" side to getting the piping right...the knucklehead used a number of unions which means making some of the changes (probably the couple of "most needed" ones is a job that can be tackled more easily.
(I installed my own boiler ... give me a shout privately)
and here are some pictures of what a more correct boiler install looks like. (I did em myself)
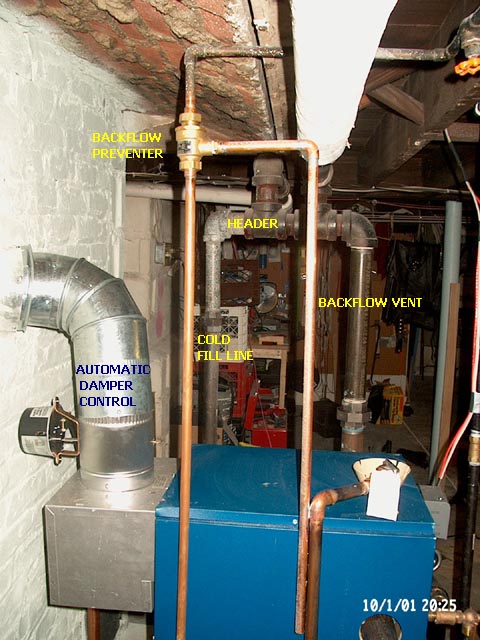
This is the picture of the header (sort of) from the left hand side.
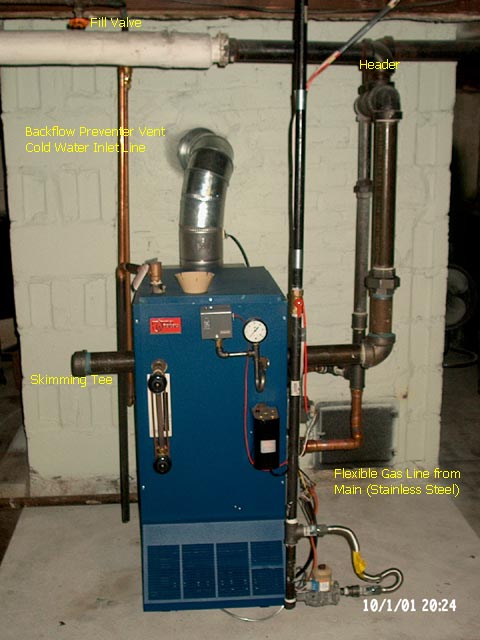
This is the whole install head on.
Richard (ROC)
--Never be afraid to try something new. Remember, amateurs built the ark; professionals built the Titanic.--
--AIM: ROConn |
|